AetherOnePi is free Open Source Radionics for your PC / Mac / Pi
This represents the official, most up to date user manual for the AetherOnePi. For development see the version on Github.

Vocabulary
Digital radionics helps to interpret the patterns created by the operator’s mind inside moldable true random numbers (hotbits, which is a name used by John Walker in his websites about the RetroPsychoKinesis Project). So whenever you read “hotbits” it means TRNG (true random number generator), but only if they are not yet “used” (unobserved, undeterminated).
AetherOnePi (short AOPi) is a name which refers to the aether (a medium existing everywhere), One as “everything is one” (through the aether), and Pi (the greek character used also for calculating the ratio of a circle’s circumference to its diameter … but it is a wordplay, which refers to the RaspberryPi as the first source of hotbits).
Prerequisites
You need a computer, a PC or Mac or Linux machine. AetherOne does not work on a tablet or cellphone. But it can run on a cheap Raspberry Pi 3 or 4 (or greater).
JAVA, you need to install the version 24 for the AOPi version > 2.x.x.
Download the latest AetherOnePi version
You can download the official release here.
Or if you want to download a beta version, sign in to Github (or sign up if you have no account).

Go to https://github.com/isuretpolos/AetherOnePi/actions
Open one of the builds that is green …

… there you will find the “Artifacts” section where the most fresh build generated a Zip file for you …

Download it and unzip it on your harddrive (or USB stick if you want a portable one).
You will see something similar to this content:

HOTBITS
First let’s generate some hotbits. If you have a webcam this can be done very easily (fun fact: a cheap webcam works better than an expensive one, because the chip is able to produce more randomness).
Follow the instructions in the video how to collect hotbits from your webcam.
Additional note about the webcam:
While you should cover the webcam in order to increase the hotbits production (more noise), the lens should not be covered completely so that you get a black image.

But just cover it slightly with a piece of paper or a clothe. The resulting image look like this:

Back in the root folder you see a new folder “hotbits”.

You can open this folder if you want …

… but be aware that if you open the file, the content determined by your observation and the hotbits are gone. When you do this you should throw away the one file. AetherOnePi deletes the packages automatically once it has used them.
Ok, here, because you are so curious what is inside one package:

At the bottom the amount of hotbits packages (it is called “cache” because they are stored on the harddrive).

When you webcam driver oversimplifies the input of your camera, then you can not use this webcam for hotbits. Your analysis will look like this:

Unfortunately this is exactly the case with most webcams integrated in notebooks. Then just buy a cheap external USB webcam, plug it into your notebook and use that instead of the embedded one.
Settings

The SETTINGS tab has a few options you can change if required.
“analysis.very.high.max.hit” means that the “Energetic Value” during analysis of each rate needs to be 1000 or higher in order to stop analysis. Else the normal mode is only 100. During analysis hotbits / true random numbers are used to add a random number from 0 to 10 to each rate. If the sum reach the “max.hit” value the analysis stops. So 100 is a fast analysis, 1000 is slower and costs you more hotbits. If you use your webCam to produce hotbits, then just leave this setting on true.
“broadcast.delta.time” means that the duration of broadcast is relative to the general vitality of the target and the rate. Example: GV of target is 700 and that of the rate is 900, so the duration of the broadcast is 900 – 700 = 200 seconds = 3 minutes. Else the time would be 900 seconds, 900 / 60 = 15 minutes.
“broadcast.embedded” switch between the modes of broadcast display inside a single dialog window or inside the broadcast tab.
This is the normal dialog window:

and this is the embedded mode inside the BROADCAST tab:

“broadcast.single.rates.only” will broadcast one rate after another and not all at once. This can be useful if you use radionics for agriculture and or just need a very slow approach of broadcasting. (sometimes things requires slowness)
“dynamic.adjustments” checks if at the end of the broadcast the target has a higher rate than the rate (if the broadcast was successful in balancing) and removes the broadcast from the queue. If not, the rate will be added to the end of the queue and the broadcast repeats until it was successful. The time of broadcast is reduced for each iteration.
You find these settings inside a json file in the folder “config”, which you can copy and use for other instances of the AetherOne.

“play.binaural.sound” is a feature that plays a binaural sound if the rate is in resonance with the target. During broadcasting the software checks with additional analysis if the rate resonates with the target. If this “event” occurs the software checks for the frequency and plays the sound for the duration of the resonance. Friends use this sound for example for their garden plants to get rid of infestation, parasites and unwelcome neighbours.

THE POWER SWITCH
“power.switch” is the one power switch you always wished for. It will repeat endlessly the broadcast, until you decide to stop it.
“use.overlay” switch between two styles of display in the AetherOnePi, if true you will notice the usual softer color and without the look has more contrast.
Multiple Instances of AetherOnePi
You can copy your AetherOnePi folder and rename the folders. The title of the AetherOnePi then contains the name of the folder. I copied 4 instances, each folder has simply a number from 1 to 4. Be aware that you should not copy the hotbits for each instance, because else analysis does not work. For each instance you need your individual hotbits packages (generated with WebCam).
Session

The SESSION tab is for registering a new “target”, a person, animal, plant or area, or abstract thought, idea, whatever you want to analyze and later broadcast to.
Type in the NAME, maybe a DESCRIPTION if you want and then click on SAVE. The name appears in the title bar of the AetherOnePi. If you click NEW the current analysis and broadcast data will be cleared from memory and you can begin a new session. But if you want to continue with your session, just go ahead to ANALYZE tab.
Sometimes we have a strange feeling about a target, a person who “feels funny”, not right. Therefore I implemented the special button ESSENTIAL QUESTIONS, which will ask the question how appropriate it is to work with the target. Take a look at the screenshot:

It says the “appropriateness” is 97%, so he (in this case it was a person) has no bad intention towards me. But it would be not ok to work with him, because he needs to learn a lesson from his current situation. The software also asks if there is a chance in the future to work with him. In this case it says again very clear NO!
But in the case of my imaginary friend “John Dude the cat” I have permission (YES with GV of 899), it is also in the person (or imaginary’s cat) best and highest good (YES with GV of 723) … but not in my best interest. Naturally this is just an example to show you what kind of answers are possible.


You see a few other example answers: YES in one month, so wait at least one more month before trying again.
You can also LOAD the case from your drive again and continue working with it.
And you can EDIT CASE, which means add details of your current intention with a description.

The “rest” of the buttons is still WIP (work in progress).
How to analyze imbalances
I will use an area balancing of Mexicali as an example how to generally use the AetherOnePi, how the “workflow” looks like for digital radionics.

Open Google Maps or Bing Maps, place the AetherOnePi Gui on top of it, so you can focus on that area without investing too much energy in imagine the area solely in your mind. Then inside the SESSION tab type the name of the target “Mexicali” and click on save. You should see now the name in the title of the application too.

Switch to the tab ANALYZE. Now focus your intention to find out what is wrong with this city. Look at the image in the map. When you get a strange feeling of tension (or like a hot flash) then you have established a link to that place. Exactly in this moment press CTRL in order to trigger analysis inside AetherOnePi.
If your focus and intention was perfect, then you get not only a good analysis of the area, but also you recognize a lot of repeating patterns.

In my case I git Manganum and Kali rates twice. Both Manganum and Kali are metals.
Ask yourself the question: “Are there more there more patterns?”
If you have this curious attitude, you will get more insight. With more insight you can dig deeper and reach deeper levels. Then your radionics work become better and better.

For example Manganese and Kalium are both on the same row 4 in the periodic table of elements. This means the main problem is iron, a symbol for hard work. But iron is also a symbol for fighting, a soldier, or someone who lives from repeating tasks, doing all day long the same thing for a living.
Now check the general vitality of the area:

Press once the Return or Enter key. The general vitality (or GV) of the target appears on the lower right corner as indicated in the screenshot.
The GV is a relative value. Sometimes the software works better after some time and you get better results. A GV of 737 means it is ok, could be way better, but it is not the worst case. There is a lot of potential for improvement.
After that check the GV of each rate. Repeat pressing Enter for each rate. But do not continue after you have reached the last one.

Now what you see here in my screenshot is a energy field that “resist” a bit (but not much). No rate was higher than 1000. This is ok for the first time. The difference between the highest GV rate was 989 and the target has 737, which means this could help to improve the situation a bit.
BROADCAST MIX
Let’s try it out. We broadcast every rate as a “mix” with the button BROADCAST MIX.

Also go to the SETTINGS tab and disable “broadcast.single.rates.only”, because we want more power!

When you switch to the BROADCAST tab you see every single rate swinging …

What is not visible remains inside the Queue, which has now 6 more entries waiting to be broadcast too.
RESONANCE WAVES
Maybe after some time you will get “resonance waves” which is a good indication the broadcast is working and balancing is triggered.

Under the RESONATED RATES table you can see which rate has resonated how often during the broadcast session.

Repeat the GV check
Now go back to the ANALYZE tab and press again Enter twice in order to repeat the GV check of the target.

In this case the improvement was very small. No problem, this is typical for an area big as that. You should know that than more you repeat the broadcast, than better the “link” gets and you are able to shake the energy there. If you have friends who also work with radionics, doing this kind of work together brings fantastic results. Whenever I taught radionics during a live session to someone, the results was way better than doing it all on your own.

I have repeated the analysis of each rate and the result is really good. Now take a look at the screenshot, Manganum GV is 1050, this is what we call a “hit” (higher than 1000).
But Solanum GV is 1175 and Kali Chloricum is 1452!!! So the first broadcast opened the channel for us. It was not in vain. Just broadcast the “mix” for the first time and see what happens with the energy.
When I reach this point, I naturally want to know why Kalium chloricum is so good for this area. Then I click on the same row on the button CLARKE (which is only available for the Clarke Materia Medica with Urls) and on the button URL (which opens the Materia Medica link respectively of the rate or homeopathic remedy).
From what I understand is that Kalium chloricum is a typical remedy against asthma. No wonder, Mexicali has a really bad air pollution. This needs to be broadcasted.

I repeated the broadcast in order to record the resonance phenomena and now you can see how it looks in the gif animation.
The new GV of Mexicali is a lot higher.

Does this mean we have “healed” the city? No, unfortunately not. But this change the probability that somehow the air becomes a bit better during the next days. Also in order to stabilize the improvement you want to repeat it every few days.
AUTO MODE (version >= 1.3.2)
The AUTO MODE is a very dynamic way to broadcast and balance. In my personal experience this is the SUPER POWER SWITCH for emergencies, it can push the general vitality up higher than 1000 (sometimes to 1400!!!) and I can feel that something changes, against all the odds and counter tendencies deriving from an ill collective spirit.
The typical approach is to make a normal analysis of a target, check for GV of all rates. And after that instead to push the BROADCAST MIX button, click on AUTO MODE ON.

You will see that it analysis fast in the beginning, becoming slower when more and more rates are broadcasted. The internal procedure checks for the new GV of the target. If it is lower than 300 it will perform an analysis of the selected rate list and check each rate if it the GV of the rate is higher than 1400 or if the GV of the rate is higher than 700 of that of the target. Only then it will be broadcasted or added to the queue.

Be aware that AUTO MODE consumes a lot of hotbits as long as it is switched on. If you feel that it is enough, just click on AUTO MODE OFF and let it run until finished.
You can see the current GV in the ANALYSIS tab and at the left bottom corner the average GV of the last 10 checks. The color of the label change according to the GV.
I recommend to switch on the HOTBITS collection mode from the webcam in order to not run out of it.
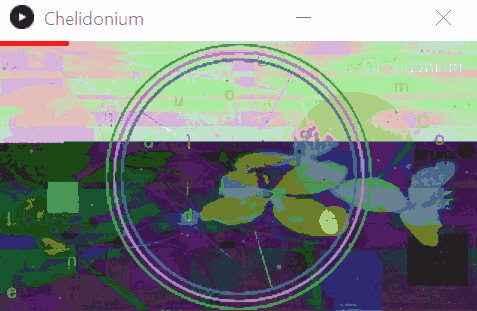
IMAGE BROADCASTING (version >= 1.3.3)
This is a feature that enables the operator to become very creative. On the tab IMAGE you can PASTE IMAGE you copied before into your clipboard into a queue of images (more than one are possible).

Here you can see I inserted an image of Chelidonium. I continue pasting more images until I feel that the signature or the link towards the right morphic field is strong.
Or you can load an image file from your computer by clicking on LOAD IMAGE. (since version 1.3.4)

Then go back to the ANALYSIS tab and click on BROADCAST button of the corresponding rate row.

Important: You need to switch off the “broadcast.embedded” setting first (red or false), because the image is only broadcast in the additional window mode.

Then you will see that the image is overlaid into the broadcasting unit image.
CLEAR button
Like UV light for clearing all energies bound to an analogue device, the CLEAR button eliminates the energies of the previous session bound to the AetherOnePi instance. Naturally this is a symbolic way of clearing. You could use your own methods.
… work in progress …
See also:
